Custom Insights in GA4

March 28, 2025

Imagine this: it’s Black Friday, your biggest sales event of the year. Traffic is surging, customers are eager, and your team is poised for record-breaking success.

But unbeknownst to you, a subtle glitch on your checkout page is causing transaction numbers to plummet.

By the time you manually spot the drop, precious hours and countless sales have been lost. Nightmare.

But what if you could get an automatic heads-up the moment things start to go awry?

Enter Google Analytics 4 (GA4) Custom Insights. This powerful, yet often underutilised, feature can be your vigilant watchdog, monitoring your website’s performance around the clock and alerting you to significant changes – especially crucial deviations – on an hourly basis. Whether you’re gearing up for a major promotion, a seasonal peak like Christmas, or simply want peace of mind, setting up custom insights is a game-changer.

This comprehensive guide will walk you through exactly how to create and manage these invaluable alerts, ensuring you’re always one step ahead.


Table of Contents

Why GA4 Custom Insights Are Your Business’s Best Friend

Responsiveness is key. You can’t afford to wait for daily or weekly reports to uncover critical issues or, indeed, unexpected positive surges.

There’s nothing worse than having to explain to a boss, or a client that they’ve got no data to show because you didn’t realise an error 30 days ago!

Custom Insights in GA4 offer several compelling advantages:

  • Proactive Problem Detection: Get notified about anomalies in key metrics – like a sudden drop in transactions, a spike in error pages, or a dip in conversions – allowing for swift investigation and resolution.
  • Peak Performance Monitoring: During crucial periods like Black Friday, Cyber Monday, new product launches, or seasonal sales, hourly insights provide the near real-time feedback needed to ensure everything is running smoothly.
  • Data-Driven Peace of Mind: Knowing that GA4 is actively monitoring your chosen metrics allows you to focus on other strategic initiatives, confident that you’ll be alerted if anything needs your attention.
  • Capitalise on Positive Trends: Insights aren’t just for bad news. You can also set them up to detect significant positive changes, like an unexpected surge in traffic from a particular campaign, helping you to understand what’s working and double down on success.

What Exactly Are GA4 Custom Insights?

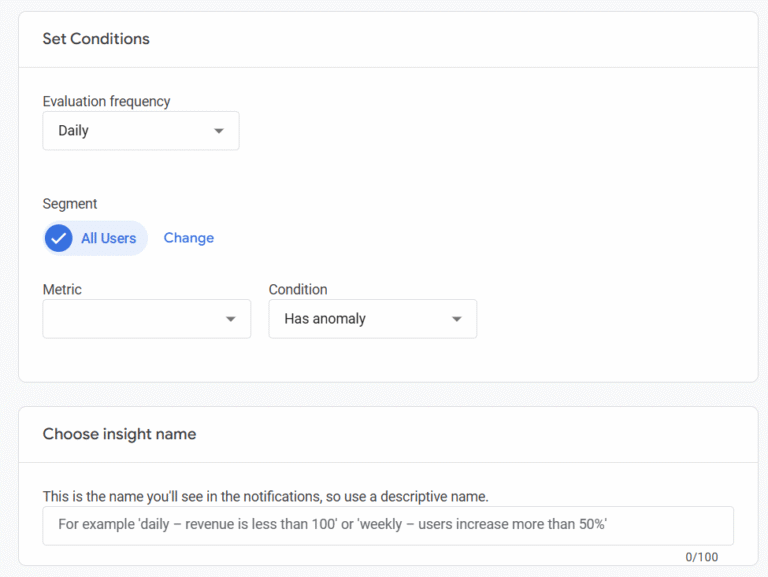
At their core, GA4 Custom Insights are user-defined rules that trigger alerts when specific conditions related to your website’s data are met.

Instead of manually trawling through reports, you tell GA4 what to look out for (e.g., “a significant drop in transactions compared to the previous hour”) and how often to check (e.g., hourly or daily).

If the condition is met, GA4 flags it as an “insight” and can notify you via email.

Anomaly Detection

The “anomaly detection” feature is particularly powerful, as it uses Google’s machine learning to identify unexpected deviations from normal patterns, saving you from having to define precise percentage changes.

Step-by-Step: Setting Up Hourly Custom Insights in GA4

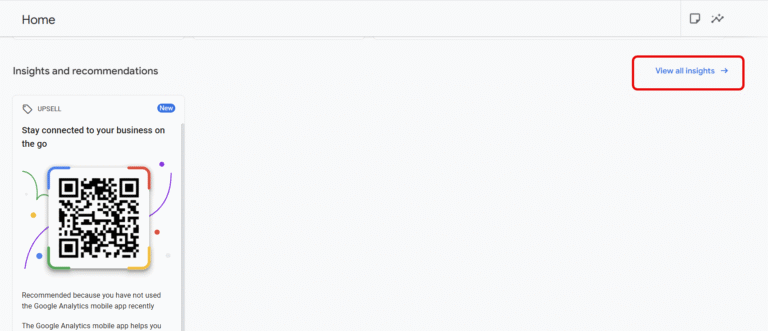
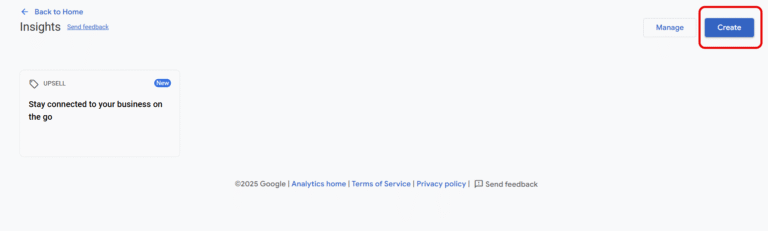
Ready to empower your analytics? Here’s how to set up hourly custom insights to monitor your website traffic:

  1. Navigate to the Insights Section:
    • Log in to your Google Analytics 4 property.
    • On the GA4 Home page, scroll down until you see the “Insights and Recommendations” card.
    • Click on “View all insights”.
View All Insights GA4
  1. Create a New Custom Insight:
    • If you have existing insights, they’ll be listed here. To create a new one, click the “+ Create” button in the top right corner.
    • GA4 will present some “Suggested custom insights.” While these can be useful, for maximum control, especially for hourly monitoring, we’ll “Create new” from scratch. Click this option
Creating Insights within GA4
  1. Set Evaluation Frequency to Hourly (The Critical Step!):
    • This is where the magic happens for real-time monitoring. Under “Evaluation frequency,” select “Hourly”.
    • You’ll immediately see a notification: “Hourly insights are only supported for web traffic. We recommend changing the segment to have ‘Platform’ includes ‘web’ only.” This is crucial.
    • Click the “Change” link within that notification (or under the “Segment” section).
    • In the “Build new segment” panel:
      • Search for or select “Platform” under “User” or “Session” dimensions.
      • Set the condition to “exactly matches”.
      • Enter “web” as the value.
      • Click “Apply”.
  2. Select Your Key Metrics:
    • Now, you need to tell GA4 what to monitor. Under the “Metrics” section, click on “Select metric.”
    • You’ll see a wide array of options. Consider what’s most critical for your website during peak times:
      • For e-commerce: Transactions, Ecommerce revenue, Product revenue, Conversions.
      • For lead generation: Conversions (for your specific lead gen events), Event count (for specific form submission events).
      • For content sites: Page views, Sessions, Entrances, Engagement rate.
    • For this example, let’s choose “Transactions” as highlighted in the video transcript.
  3. Define the Condition:
    • This determines what triggers the alert. You have several options:
      • “Has anomaly”: This is often the recommended starting point. Google Analytics uses its machine learning algorithms to detect unusual patterns or deviations from the norm for that metric. It’s a smart and often effective choice.
      • “Percentage increase more than” / “Percentage decrease more than”: If you have specific thresholds in mind (e.g., alert me if transactions drop by more than 30%), you can define them here. You’ll also need to set a “Comparison period” (e.g., “Previous hour,” “Same hour last day,” “Same hour last week”).
    • For simplicity and leveraging Google’s intelligence, let’s stick with “Has anomaly”. When this is selected, you don’t need to define a separate comparison period for the anomaly detection itself, as GA handles this.
  4. Name Your Insight for Clarity:
    • Give your insight a descriptive name so you can easily identify it later. For instance: “Hourly Transaction Anomaly Alert” or, as in the transcript, “Anomaly in transactions (hourly)”. Make it clear what the insight is monitoring.
  1. Configure Email Notifications:
    • Under “Manage notifications,” ensure the email toggle is switched on if you want to receive alerts.
    • Your email address (the one associated with your GA4 login) will likely be pre-filled.
    • You can add other email addresses by separating them with a comma (e.g., `yourcolleague@example.com, team@example.com
managing custom insight notifications in GA4

So there you have, custom insights. Often overlooked, but once in play, never undervalued. Set them up today.

Kyle

Author

Hello, I'm Kyle Rushton McGregor!

I’m an experienced GA4 Specialist with a demonstrated history of working with Google Tag Manager and Looker Studio. I’m an international speaker who has trained 1000s of people on all things analytics.

Scroll to Top